Wednesday, 24 February 2021

MEM CM Technical Preview 2102 - Troubleshooting Collections with the View Relationships Tool

Introduction

The IT helpdesk worker gets a call complaining this or that application has not installed, even though the user has been informed the application has been deployed to the correct collection for the device.  The helpdesk worker knows that Configuration Manager is the agent, on the device, that is used to install the application. 

The helpdesk worker needs to do a few checks to determine why the application is not installed.

1) He or she may check the CM client is actually installed on the device.

2) He or she may check the CM service (named SMS Agent Host) is running on the device.

3) He or she may check the CM logs to ensure the machine policy process is taking place.

4) He or she may check that the Application Evaluation action has taken place.

4) He or she may check there are no firewall rules preventing the client communicating with the CM server components

5) He or she may check the CM cache is not full.

6) He or she may check that the application source files have been distributed to the correct distribution point server.

There may be some bespoke tools the helpdesk worker may use also to troubleshoot the failed application.  At some point however, having found no further issues - the helpdesk worker will need to ensure that the device is in the collection, to which the application has been deployed.

And then the penny drops - the device indeed is not in the collection.  And if this is the case - the device is never going to run the application.  Not until the issue is resolved, and the device name does appear in the collection - not until then will the application install on the device.

In this article I will step through the troubleshooting process - determining why a device is not in the collection it should be in.  I will use the new collection graphical feature introduced in SCCM 2010 to show how this new tool can indeed assist us with solving such an issue as this.

I will cover three necessary checks required in the collection membership examination process:

1) The collection membership rule is correct.

2) The device configuration meets the criteria defined by the collection membership rules.

3) The collection's dependencies and relationships to other collections is correct.

The Collection Membership Rule

I have a collection called Virtual Machines and I have a number of virtual machines in my MEM CM technical preview 2102 site.  My Hyper-V virtual machine, whose NetBIOS name is MDMClient1, should be in this collection - but it is not. I only have the one virtual machine in the collection, and this is in fact the MEM CM site server itself - server2b.


I  navigate to Assets and Compliance\Overview\Device Collections and highlight the Virtual Machines collection.  I right click on the collection and select Properties.


The Virtual Machines Properties windows appears with several tabs.  I will click on the Membership Rules tab.  Here we can see there is a rule called Virtual Machines.


I can then click on the Edit button (after highlighting the rule).


The next step is to click on Edit Query Statement.


If you are confident with using SQL or WQL expressions you will want to click on Show Query Language.  For this collection the WQL query is as shown below.


Highlighting the expression and a right click and a copy and paste reveals the total WQL query.  The important bit is the defining condition after the where statement:

select SMS_R_SYSTEM.ResourceID,SMS_R_SYSTEM.ResourceType,SMS_R_SYSTEM.Name,SMS_R_SYSTEM.SMSUniqueIdentifier,SMS_R_SYSTEM.ResourceDomainORWorkgroup,SMS_R_SYSTEM.Client from SMS_R_System inner join SMS_G_System_COMPUTER_SYSTEM on SMS_G_System_COMPUTER_SYSTEM.ResourceId = SMS_R_System.ResourceId where SMS_G_System_COMPUTER_SYSTEM.Model = "Virtual Machine"

We see here that the collection is expecting a machine's model to have a value of  'Virtual Machine', if it is to be a member of the collection itself.

If you are not comfortable with WQL, rather than clicking on Show Query Language, you can click on the Criteria tab to determine the condition that is required, as shown below.


Now that we know the criteria for the collection membership we can then determine if the device configuration itself meets that criteria.

The device Configuration

In our example we do know that unless our device has a Model value of 'Virtual Machine', it will not appear in our collection.  How do we determine the exact model value for our machine?  There are a number of ways and I shall illustrate two of them.

Perhaps the easiest way is to click on Run, from the device itself, and then enter MSInfo32. The System Information tool appears and you can determine the WMI value for the Model in the right hand pane.


As can be seen, the value of Virtual Machine is listed and this is the correct value for our collection.  

Another way to retrieve the Model value is to use PowerShell, which seems to be the de rigueur way of doing things in the Windows world these days.

I do open up a windows command prompt with elevated privileges. I type in:

powershell.exe -executionpolicy bypass

After pressing Enter I have the PowerShell command interface ready to retrieve the model value.  I can retrieve this by typing in:

(Get-WmiObject -Class:Win32_ComputerSystem).Model

After pressing Enter I do have the Model value as shown.


Once more, using PowerShell, I have verified that the Model value is correct.  The next step is to check the collection relationships and dependencies. 

The Collection Relationships

Because we are using SCCM technical preview 2102 we do have the very useful Collection View Relationships tool.  This will help us to get to the solution to our problem - that is, the reason our virtual workstation is not appearing in our Virtual Machines collection. 

Firstly, using the CM console, we right click on the All Systems collection and select View Relationships


In my environment the tool presents two collection dependent pages.

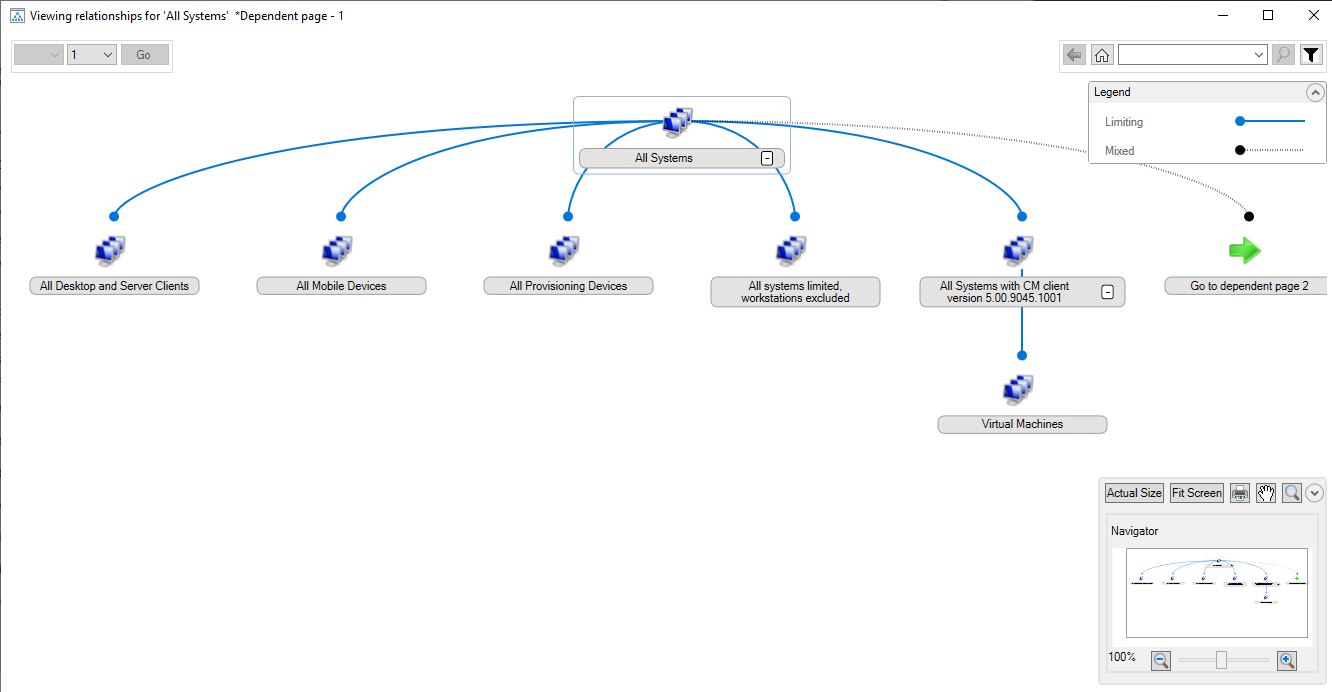
Here is the graphical page one view.


And by clicking on the green arrow to the right I am taken to page 2.


The blue lines detail the limiting collection for each collection at a lower level from the All Systems collection.  We do know that unless a device is in the limiting collection for the bespoke collection we are analysing, the device itself cannot appear in our bespoke collection.

We can see from the graphical tool that the limiting collection, for our Virtual Machines collection, is the following collection: All Systems with CM client version 5.00.9045.1001.

And checking the criteria for this parent collection we confirm that indeed the Configuration Manager client needs to be on version 5.00.9045.1001.  This is the correct client version for the SCCM Technical Preview 2102 release.


Thus we can determine that we should check the CM client version on the client as a next step.  Unless the client version is correct, the device will not appear in the limiting collection and thus it will not appear in the bespoke collection itself - in this case the Virtual Machines collection.

On the client I do open the control panel and click on the Configuration Manager applet.

Here on the General tab I can see that indeed the Configuration Manager client version is correct.


We are still to get to the exact cause of our issue.  We know that the device should be in our bespoke collection but it is not.  So let us once more see if the View Relationships tool can provide us with another clue as to the reason for our dilemma.

The next thing I do is right click on my Virtual Machines collection and select View Relationships.  This gives me a graphical view of all the relationships for our bespoke collection.

We can see from this diagram that the immediate limiting collection, All Systems with CM client version 5.00.9045.1001, also has an Exclude relationship with the Developers Virtual Machines collection.  We know this is an exclude relationship from the Legend box that appears  to the upper right in the graphical tool. The grey dotted line is an exclude relationship.


Thus checking the properties off the Developers Virtual Machines collection I can see that my workstation device is actually added as a direct membership.


The penny drops:  because this is an Exclude limiting collection, and because my problematic device is in this exclude limiting collection - the problematic device is also filtered out of the bespoke Virtual Machines collection.  A possible solution therefore, is to remove the Direct Rule for my problematic device from the Developers Virtual Machines collection.

Having removed the direct rule and refreshing my bespoke Virtual Machines collection - my problematic device now appears in the Virtual Machines collection.


Conclusion

Hopefully I have shown in this article, how following a sensible set of checks and verifications, and by using the new Collections Relationships tool, we can eventually arrive at the cause of a failed application deployment.  In this case there was no failure as such, only a misunderstood relationship between a number of collections  - preventing our target collection from being populated with the device itself. 
I hope you have enjoyed reading this article and I wish you the same success in your own collection relationship analysis.

Colin

Wednesday, 20 January 2021

Community Hub Support for Application Content - CM Technical Preview 2012

Introduction

I have been working in the IT industry a long time.  Long enough to remember days when IT support staff would run up or down a flight of stairs, locate a user's desk, insert a floppy disk or a CD into his or her device and install the required application.  Of course this was time consuming but also prone to error - some applications need to be installed in a particular way.  One incorrect click and that application might not install or might not work as required.

And then I might come in, as a Systems Management consultant, install SMS or SCCM - and everything was a little easier and a little more efficient.  But there was always a gap between manager expectations and the reality of what the management product could deliver: and this was particularly so in terms of application deployment.  Sometimes this was due to the sales person miss selling the product, or perhaps the consultant not clearly detailing requirements and limitations.

You see the key thing here is that Configuration Manager is good at delivering an application's source files to a group of devices.  It is also good at executing a command line on those devices to install those applications.  But Configuration  Manager did not, and cannot, magically determine what that command line should be for each company's application deployment requirements.  Most companies have certain standards - some might prefer their employees to run through a wizard but most will want those applications installed silently without user input.  This means also the application can be installed outside of business hours and thus there is no deleterious impact on user productivity.

And some applications unfortunately will not install silently without a bit of engineering.  They might need to be part of a scripted installation, or they might require a string of undocumented parameters - and thus the IT discipline of 'packager' was born.  Quite often a packager may be required to create a customised installer file called an MSI file.  And even if a default installer file will complete the task, sometimes locating this file can itself be a challenge.  To this day packagers are still required by IT departments to ensure the application installations taking place are processed safely and in accordance with professional standards and best practises.

This does impact the IT budget and so Microsoft has implemented the ability to share application content and configuration requirements via the Community Hub.  You can download those published application definitions and files and quickly have them registered and deployable in your environment.  This feature is now available in Technical Preview 2012.  Let's see how this works in practise by downloading the System Center Updates Publisher app.

Using the Feature

On a Windows 10 device with the CM console installed and opened, the administrator will navigate to Community\Community hub.  From here, and from amongst the numerous community hub offerings, the administrator can locate the System Center Updates Publisher app.


The administrator can then click on the System Center Updates Publisher tablet to commence the download.

The administrator enters in the share location.


The app begins downloading.


The app content and configuration download completes. 


The administrator can then verify the installer file is in the defined location.


And finally the administrator can check that the package has been registered in SCCM with the appropriate deployment type configuration.


Conclusion

This new feature is a great addition to a great product.  In minutes I was able to register the System Center Updates Publisher app along with its source MSI file and all the required deployment type configuration.  I can then distribute the source content and deploy the app to the devices that require it.  Such an effort might be take between 1 and 10 days if I had to:

1) Download the installer file manually.

2) Research and determine the MSI parameter switches required for an unattended installation and uninstallation command line.

3) Register the app in SCCM.

4) Test the install and uninstall deployment type on a set of test machines.

Obviously the administrator is still required to perform all required testing and quality assessment requirements - but no one can argue that this new feature is very good and will be much used when it is implemented into the current production release of SCCM.

I hope you enjoyed reading this article and I hope you have similar success in your own testing and demonstrations.

Colin


Tuesday, 12 January 2021

Configuration Manager Technical Preview 2012 Community hub Console Extensions

Introduction

IT professionals might like to write a script or develop a report, that will work with Configuration Manager; and they might desire to do this themselves.  After all this is how an IT professional develops those skills that are in great demand in industry and commerce.  All too often however, deadlines and daily demands reduce this development time.  Microsoft knows this too well and thus they have integrated the community hub with Configuration Manager.  An IT administrator can leverage the efforts of those who have faced similar tasks, conquered those tasks, and published those achievements on the community hub.  You can then retrieve these products from within the Configuration Manager console and approve them for use in your site hierarchy.

In this article I will download and enable a Configuration Manager console extension.  This useful feature allows an administrator to right click on a Task Sequence Deployment and view status messages from devices that have run that assigned Task Sequence.

Feature Requirements

In order to access the community hub from within the SCCM console you will need Windows 10 build version 17710 or higher and .Net Framework version 4.6 or higher installed on the device from which you will run the console.

In addition, you will need to enable the SCCM site communication setting: "Use configuration Manager-generated certificates for HTTP site systems"


Enable the Configuration Manager console extension.

Open the SCCM console on your Windows 10 device and navigate to Community\Community Hub. A series of tablets for various downloadable SCCM add-on features will appear.


Click on All Objects and in the search bar type "show all status messages for a task sequence deployment".  Click on the search icon - the tablet for the Task Sequence status message add on appears.


When clicking on the tablet you are then presented with the option to Download the console feature.


It is then a matter of clicking on Download and the right-click Task Sequence Status Message viewing feature is installed in your SCCM console.


Using the new Right Click Status Messages Console Extension

Using the new feature is straight forward.  Navigate to one of your Task Sequences that has been deployed and executed by at least one client - Software Library\Overview\Operating Systems\Task Sequences.  Click on your Task Sequence and then click on the Deployments table at the lower portion of the console.  Right click on the deployment and click on Show Status Messages.


The Status Messages Set Viewing Period window appears.  Configure the time settings as required.

You then have access to the required status messages for your troubleshooting purposes.


I hope you enjoyed reading this article and I hope you have similar success in your own testing and demonstrations.

Colin


Thursday, 17 December 2020

Software Center Customization Tabs - MEMCM Technical Preview 2012

Introduction

Microsoft Endpoint Manager is a very mature product and consequently it is full of little features that are often overlooked and under used.  One such feature is the ability to configure up to five tabs in the the Software Center application.  These tabs will have an admin assigned name and will point to a content URL.  This might be useful for users who are very much familiar with the Software Center and may find it easy and quick to open up Software Center and click on their required tab.  They then may have quick access to whatever assets that URL provides, for instance: driver downloads or an industry related partner website.  In this article I will detail how to use the feature, limitations of the feature if used prior to the Technical preview version 2012, and how the latest release fixes these limitations.

The Feature

Configuring and using the feature is very easy.  As an administrator you will open the SCCM console and navigate to Administration\Overview\Client Settings.  You will right click on your particular client settings object and select Properties. You will then select the Software Center option in the left column and then click on Customize in the right pane and next to Software Center settings.


When you have clicked on Customize you are presented with the Software Center Customization window.  You can then select the Tabs tab and then click on Add Tab.


You are then able to enter in a name for your custom tab and also the required URL.  In this example I have entered in https://www.microsoft.com as my required URL.

All that is remaining is to click on OK three times and your new tab will begin appearing in your user's Software Center application.

The Problem

Before the release of SCCM Technical Preview 2012, Software Center relied on the built in Internet Explorer browser control.  This now results in many script type errors revealing themselves whenever the user attempts to access this tab using the Software Center application.

This can be seen, in my example, if I open up the Microsoft tab in the instance of Software Center on the server itself.


The Fix

It would be a bit too obvious if upgrading the SCCM agent client to version 5.00.9043.1000, which is the client version shipped with SCCM 2012 Technical preview, completely fixed the issue.  In addition to upgrading the client, the fix will also require installing Microsoft .NET Framework v4.6.2 or higher.  In addition we are required to install Microsoft Edge WebView2 runtime on the user's device.

To find out more about WebView2 browse to:

About WebView2

The download of WebView2 can be found at:

WebView2 Download

You only need to download the Evergreen Standalone Installer.


And having ensured all requirements are met on the Windows 10 20H2 client I can open up the Software Center application and navigate to my custom tab.  And I receive none of the script errors. And the page is nicely formatted, just the way the author intended it to be displayed.


I hope you enjoyed reading this article and I hope you have the same success in your SCCM upgrade and testing exercises.


Friday, 27 November 2020

Configuration Manager Preview 2011 - Software Center notifications display with logo

Introduction

Depending on how your corporate Windows build is configured, your users may simply ignore the various notifications that appear from out of the task bar or within the action pane.  Words are great but there is a reason why most companies create for themselves a logo.  Here are some of them:

1) A logo is designed to grab your attention.

2) A well designed logo creates a strong first impression.

3) The logo becomes a foundation for the identity of a brand.

4) It separates your organisation from the competition.

And many more reasons.  If you can configure your Software Deployment processes with a company logo then you do go some way to highlighting the importance of your particular deployment, from all those other notifications that may be appearing on the desktop.

In the latest version of the preview edition of Configuration Manager (2011) we can now configure SCCM so that application deployments make their targets aware of their existence with a company logo.  I decided to test this feature and here is how I went about doing the test.

Creating the Company logo.

In most cases the IT administrator will not have to worry about this task because, of course, their manager will expect them to use the existing company logo.   But you might, like me, be testing this on your home lab.  I decided to install a logo making app called, quite simply, Logo Maker.  I found this in the Windows Store.  It is very easy to use and within fifteen minutes I did have a logo I could test for my imaginary company called MDM Searle.


With this handy app installed I did come up with my test logo.  It won't win any design awards but it did prove suitable for the task in hand.


By necessity the logo could not be overly intricate and this is because Configuration Manager will not accept a logo image that is greater than 400 by 100 pixels.  After creating the logo using the Logo Maker App I then opened MS Paint.  I changed the picture size to the required 400 by 100 resolution and copied the logo onto the blank space.  After resizing the logo to fit the picture size in MS Paint I was able to save the logo with the correct dimensions.


Configuring Client Settings

Having created the logo the next step is to import it into Configuration Manager.
Open the Configuration Manager console and navigate to Administration\Overview\Client Settings.  Right click on your client settings object, select Properties and then click on Software Center.  If you are creating a new custom client settings object, select Create Custom Client Device Settings and select Software Center as the component to configure.  In this case I select the Default Client Settings object.

For the Select the user portal option I select Software Center.  I then select Yes next to the Select these new settings to specify company information option.


I then click on Customize.  In the Company name section I enter in MDM Searle


Next I click on Browse next to Select a logo for Sofware Center, and this allows me to import my logo.


It is then a matter of clicking on OK and the custom logo is configured for use with application deployment notifications.  If you have created a custom client settings object then you will, of course, have to deploy this to a collection.

It might also be a good idea to check your Computer Agent settings.  In my test lab I have ensure the setting Show notifications for new deployments is switched to Yes.


Testing Deployment Notifications with a Logo

I tested this new feature by creating a mandatory deployment for an application which I named New Company Icon test.  Of course you can use any of your existing applications or, like me, create a new application for the purpose in hand.  When you come to creating the deployment you have two options, and these can be found under the User Experience tab of the deployment properties.  You can have the logo appear in a toast notification or you can have the logo appear in a dialog window.  This choice is determined by the setting When software changes are required, show a dialog window to the user instead of a toast notification.

Under the User Notifications option I select Display in Software Center and show all notifications.


Thus with the option to have notifications as toast notifications, and with a mandatory schedule configured - I do find that the notification appears with my custom logo on a device logged in with a user who is a member of the deployment's collection.  The first instance is a notification that the application is downloading and installing.


The next instance is a notification that the application has installed.


These notifications also appear in the Action panel


If I change the deployment configuration to show a dialog window rather than a toast notification, I am presented with the following image when the deployment is required.


Finally, if you are not seeing the notifications as you expected - then confirm your Notifications and actions settings on the targeted device.


And that concludes my article on configuring and using custom logo images in Configuration Manager application deployments.  I hope you enjoyed the article and I hope you have similar success in your own tests and demonstrations.


MECM with EHTTP and HSTS enabled on a DP

Introduction Recently a penetration scan was done on a client's Microsoft Endpoint Configuration Manager's (MECM) environment.  The ...