Sunday 18 February 2024

Recover your corrupted Linux HP ThinPro Thin Client Device

Introduction

While testing some functionality in my HP  T530 Thin Client's Linux based ThinPro 8 operating system, I found myself with a corrupted partition.  I was testing the BIOS password removal process using the inbuilt hptc-bios-cfg tool.  After running the tool and initiating a reboot, the ThinPro operating system refused to load, leaving me in an initramfs shell.  Now I am not a Linux expert but I did try a few things, even finding myself in a grub shell where I could list and search each partition for the expected operating system files.  I couldn't find the expected partition with the expected files.  How was I to recover this thin client's ThinPro operating system with my limited Linux know how?  I did find a way out of this mess, which I will write about in this blog.  It might work for you as well.

How I recovered my T530 Thin Client

In summary I was able to restore my TC by:

1) Booting the TC device into the Windows PE environment from a bootable USB key

2) Deleting all partitions on the TC's drive, and creating a new partition.

3) Booting the device into the HP ThinPro PC Converter Tool's environment from a bootable USB key created using the HP ThinPro PC Converter Deployment Tool application.

4) Applying the ThinPro 8 operating system to the TC's drive.

To fix your failing ThinPro operating system you will need to install the following applications on a Windows 10 or Windows 11 device:

  • HP ThinPro PC Converter Deployment Tool (HP_ThinPro_PC_Converter_Deployment_Tool_N44254-002.msi) -  get an evaluation license and the installer here: h30670.www3.hp.com/portal/swdepot/displayProductInfo.do?productNumber=HPTPPCCT

  • Windows Assessment and Deployment Toolkit (adksetup.exe) -available here: https://learn.microsoft.com/en-us/windows-hardware/get-started/adk-install#download-the-adk-101253981-september-2023

  • Windows PE add on for Windows Assessment and Deployment Toolkit (adkwinpesetup.exe) - available here: https://go.microsoft.com/fwlink/?linkid=2243391
Install the above applications using the default installation options.  Ensure you have two USB keys.  These will be wiped clean so make sure you backup any important data on them.

Create a WinPe bootable USB key

  • Connect a USB key to your Windows device, after installing the above applications - make a note of the drive assigned to the key; this is usually d:
  • Right click on the Deployment and Imaging Tools Environment from the Start menu and select More and then Run as Administrator.


  • Extract the WinPE files by running this command: copype amd64 C:\WinPE_amd64
  • Create the USB WinPE bootable device with the following command MakeWinPEMedia /UFD C:\WinPE_amd64 <drive of USB Key>.  For instance: MakeWinPEMedia /UFD c:\WinPE_amd64 d:
  • Press Y to agree to losing any data on the USB key.


You now have your bootable WinPE USB key.  Remove it from your device.

Create a HP  ThinPro PC Converter USB key

Insert your second USB key and follow these steps to create the HP ThinPro PC Converter USB key.

  • From the Start menu run the HP ThinPro PC Converter Deployment Tool.  Browse to your license file or click to Get a Trial License.  Click on Next.


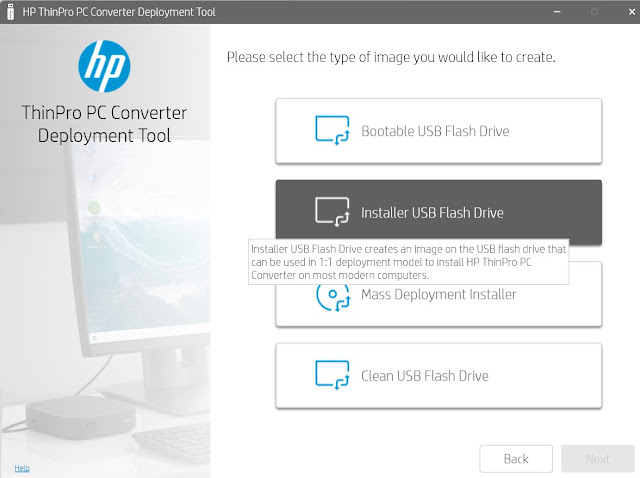
  • Click the second option - Installer USB Flash Drive


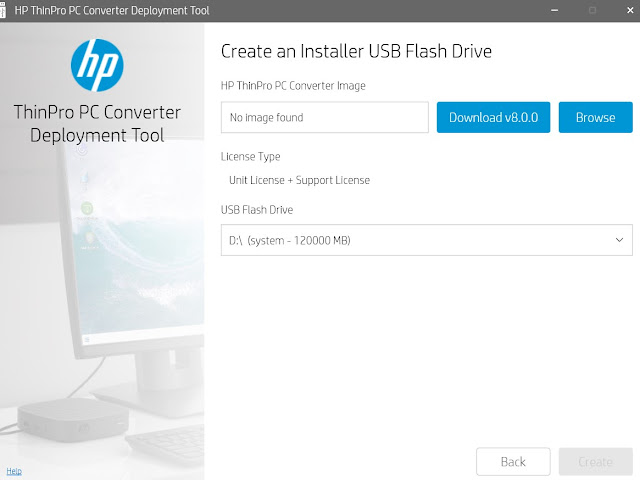
  • If this is the first time you have run the tool you can click to Download v8.0.0, otherwise browse to select the desired image if the image box is not already populated.

  • Click on Create and then Exit when the converter key has been created.
Clear your Thin Client's Partitions using WinPE

Insert the WinPE bootable USB key into a slot on your Thin Client and boot to this disk (usually by pressing F9 or ESC).  You will be presented with the cmd.exe shell.

  • Type diskpart and Enter and then list disk.  This will display the Thin Client's disks as well as the USB key.  Make a note of the TC's main disk - usually disk 0
  • Type select disk <TC's main disk - usually disk 0).  In this case I type select disk 0 and press enter,
  • Warning this command will wipe your main disk.  Type clean and enter.
  • type create partition primary and press enter.
  • Type Active and press enter
  • Type Exit and then press enter


You have now reset your primary disk to accept the ThinPro operating system restoration.

Restore the ThinPro Operating System

Remove the WinPE bootable USB key and insert the HP ThinPro PC converter bootable USB key.

  • In the WinPE cmd.exe shell type exit.  The TC will reboot.  Pressing ESC or F9 boot into the ThinPro converter USB key


  • The ThinPro converter tool will carry out a compatibility Check


  • Click on Install ThinPro to internal Storage.
  • Click on OK to accept the disk wipe out warning.
  • Click No if prompted to Preserve current ThinPro settings.
  • The ThinPro OS installation commences.  


  • The Running custom ThinState operation completes.  


  • Click on OK and click on Details to view the completed events.


  • Click on Close and remove the Converter USB key.
  • The TC reboots and the ThinPro operating system loads.  After a few minutes you are presented with the HP ThinPro setup wizard.  Complete the setup as desired.


Congratulations you have recovered your corrupted HP ThinPro Operating System.


Thursday 21 December 2023

Create a MECM maintenance window using PowerShell

Introduction

There are of course many changes required on a laptop or a desktop.  We need to apply security updates or deploy a new piece of software - we may even need to run a task sequence to upgrade the operating system.  But can we control when these changes occur?  Afterall, it would be very inconvenient for a set of updates to install on a salesperson's laptop while doing a presentation.  The installation may slow the device down or force a reboot; and this can look very unprofessional indeed.

The good news is that we can create maintenance windows on collections of devices.

Creating a maintenance window without PowerShell.

If we right click on a collection in the MECM console and select Properties, we are then able to select the Maintenance Windows node.  Here I have the Maintenance Windows node of my Sales Devices collection.  As can be seen there are no maintenance windows defined, meaning that deployments can run anytime on these devices - if the users have not specified their own maintenance window in Software Center.


We can then click on the yellow asterisk (*) and configure our maintenance window for this collection of devices.

Here I have created a five hour maintenance windows for every Tuesday between 18:00 and 23:00 UTC and for Software Updates.


Clicking on OK and then Apply will ensure that software updates only occur during this time frame on this collection's devices.

Note:  Deployments still may occur outside of the maintenance windows if the deployment has overran its deployment deadline, depending on how the administrator has configured the deployment.

Create a Maintenance Window with PowerShell

Starting with MECM 2307 we are able to create maintenance windows using PowerShell.  In this exercise we shall create the above maintenance window from the PS command console.

First we open the MECM console and click on the top white down arrow in the upper left blue box.  We select the Connect via Windows PowerShell option.


If prompted with "Do you want to run software from this untrusted publisher?" select A for Always.


We use the New-CMMaintenanceWindow PowerShell cmdlet.  Here are the options for using the collection name as the input object. 

 New-CMMaintenanceWindow [-CollectionName] <string> -Name <string> -Schedule <IResultObject#SMS_ScheduleToken> [-ApplyTo    {Any | SoftwareUpdatesOnly | TaskSequencesOnly}] [-ApplyToSoftwareUpdateOnly] [-ApplyToTaskSequenceOnly] [-IsEnabled    <bool>] [-IsUtc <bool>] 

It does look rather complicated, so let's just create one by first using the new-cmschedule cmd line to define the SMS_ScheduleToken input.  To create the above schedule token we would type the following

$ScheduleMW= New-CMSchedule -DayOfWeek Tuesday -DurationCount 5 -DurationInterval Hours -start "21/12/2023 17:00"


Having created the Schedule token we can now use the New-CMMaintenanceWindow cmdlet to create the Maintenance Window on our collection.  The Maintenance Window will be similar to the Software Updates window created above, but will have a start time of 17:00 rather than 18:00.  Its name will be MW for Sales Team,

The command line is as follows:

New-CMMaintenanceWindow -CollectionName "Sales Devices" -Name "MW for Sales Team" -Schedule $ScheduleMW -ApplyTo SoftwareUpdatesOnly -IsUtc 1


As can be seen we do get a very satisfying results return indicating that our maintenance window is created.  And if we check on the properties of the collection itself, we can confirm that the new maintenance windows is created and is correct.


Conclusion

As can be seen, we do not have to rely on the MECM console interface to create a maintenance window.  We can use the New-CMMaintenanceWindow PowerShell cmdlet to create the maintenance window from a script file or from the PowerShell console.  I hope you have enjoyed this article and I wish you similar success with your own testing of the New-CMMaintenanceWindows PowerShell cmdlet.

Thursday 20 July 2023

Microsoft Print To PDF - Setting the Paper Size Preference using PowerShell

Introduction

A client's users would often use the Microsoft Print to PDF printer driver to create a PDF file of a document.  The user would then create a Word document and send this to a printer application.  The printer application GUI would allow the user to attach the PDF so that both the Word Document and the PDF document were sent to the printer application.  Both documents might would then be physically printed and sent to the customer.

In a number of cases this failed.  On further examination we could see the issue's cause by firstly double clicking on the Microsoft Print to PDF printer, in Control Panel\Devices and Printers, and then selecting Printing Preferences.


Secondly, clicking on Advanced in the Microsoft Print to PDF Preferences window.


We could then see that the Paper Size was set to Letter.  Changing this to A4 resolved the printing issue.


This fix worked nicely, however we could not apply it manually in this way to hundreds or thousands of devices.  How could we change the paper size preference on hundreds of devices in an automated manner?  A search of GPO options did not look promising.  And so I explored a number of scripting options.  

The Set-PrintConfiguration CmdLet Option

The following command should have corrected the issue for us but it did not.

set-printconfiguration -printername 'Microsoft Print to PDF' -papersize 'A4'


The printer's paper size preference was still set to Letter.

The PrintUI.exe Tool option

Another approach I tried was to manually set the paper size preference to A4 and then use the PrintUI.exe tool to create a migration export file. I could then use this export file to import the new paper size preference on the other devices.  The command to create the printer export file was as follows:

printui.exe /Ss /n "Microsoft Print to PDF" /a c:\MicrosoftPrintToPDF.printerexport

This created the named .printerexport file.  I was then able to import this file onto other devices and it did appear to work.  Here is the command used to import the settings onto another device.


printui.exe /Sr /n "Microsoft Print to PDF" /a c:\temp\MicrosoftPrintToPDF.printerexport u

 
I did have some success with this however testing showed it had to be executed under the logged on user context.  And then it would only work when the user had elevated administrator rights.  Normally I could script around this requirement using the execute-processasuser cmdlet from the PSAppDeployToolkit.  For instance:

execute-processasuser -path 'printui.exe' -parameters '/Sr /n "Microsoft Print to PDF" /a c:\temp\MicrosoftPrintToPDF.printerexport u'

It still would not work when deployed via Conifguration Manager to a user with non admin permissions.

The Dism Option

The method that worked reliably for this issue was the Dism Option.  Using the Dism I could uninstall the Microsoft To PDF printer and then re-install it.  This would result in the papersize preference being set to to the A4.  Here is the command to uninstall the printer:

Dism /Online /Disable-Feature /FeatureName:"Printing-PrintToPDFServices-Features"

And here is the command to install the printer once more.

dism /Online /Enable-Feature /FeatureName:"Printing-PrintToPDFServices-Features"

For those who like to use the PSApp Deployment Toolkit for their packaging wrapper, here is the section in the deploy-application.ps1 script that performs the fix.


The Exceptions

In most cases this all worked nicely.  However in some cases the paper size preference was still set to Letter after the printer was removed and then re-added.  In these cases I noticed that the language for non-unicode programs was set incorrectly.  This was set to English (United States) rather than English (United Kingdom).  This setting can be found in Control Panel\Region and the clicking on the Administrative tab.


It can be changed here by clicking on Change System Locale, but only if the user has admin rights.  A reboot is then required.  Obviously this also needed automation and so I found this was possible using the following PowerShell command

Set-winsystemlocale –systemlocale en-gb

Again, a reboot is required and Configuration Manager can be configured to force this.  Once this is done, then the dism commands can be used to correct the paper size preference.

Conclusion

This is a great example of how a simple requirement can often be quite complex to achieve.  But with some tenacity and patience, we can eventually find a way through and keep our client satisfied.  I hope you enjoyed reading this blog and wish you the same success with your printer configuration requirements.


Wednesday 14 June 2023

Google Chrome - Set to Unmanaged Using PowerShell

Introduction

Recently a support technician had some issues with the Google Chrome application.  As a support specialist the ability to modify or uninstall an application is useful.  In the same way that just restarting a device can resolve many issues, so can uninstalling and reinstalling an application resolve a great many problems.  In this case however, and even with administrator permissions, the technician was unable to modify or uninstall the Google Chrome application.  If he right clicked on Google Chrome in the Start Menu, and selected Uninstall - this would bring up the Control Panel\Uninstall or change a program window.  The Google Chrome application was not there to uninstall and so the Uninstall selection item was useless.


In this company Google Chrome was a managed application.  This can clearly be seen by clicking on the ellipses icon to the right of the browser's ribbon.  The lower entry reading Managed by your organisation.


And so the reality here is that the technician is very limited in what he or she can do while troubleshooting an issue relating to the Google Chrome application.  Any setting that has been configured, such as the homepage, cannot be modified.  And neither can the application, at least in this instance, be uninstalled.  And worse - although this is by design for this organization - if Google Chrome is showing as managed on your own personal device; you may indeed have a malware or virus.

The Task

The task given to myself was simply to provide a means for the support technician to uninstall Google Chrome by clicking on an application within MECM's Software Center. A bit of research and some testing and I did find a way to uninstall Google Chrome in this scenario.  

Manually, the administrator could open a command prompt as administrator and navigate to c:\program files (x86)\Google\Chrome\Application\<version>\Installer and run the following command

setup.exe --uninstall --multi-install -chrome --msi --system-level --force-uninstall


But what if the technician only wanted to change some settings?  How could we flip this installation of Google Chrome from Managed to Unmanaged?

Solution: Force Google Chrome into Unmanaged mode

Again a bit of research and some testing and I arrived at a way to remove the Managed by your organization lockdown setting.  This did entail running a few lines of PowerShell code.  If you were to open a command prompt as administrator and then run:

powershell.exe -executionpolicy unrestricted

Within the PowerShell console, running the following commands will switch your instance of Google Chrome over to unmanaged.

remove-item -path "HKCU:\Software\Google\Chrome\*" -recurse -force

Remove-item -path "HKCU:\Software\Policies\Google\Chrome" -recurse -force

Remove-item -path "HKLM:\Software\Google\Chrome\*" -recurse -force

Remove-item -path "HKLM:\Software\Policies\Google\Chrome\*" -recurse -force

Remove-item -path "HKLM:\Software\Policies\Google\Update\*" -recurse -force

Remove-itemProperty -path "HKLM:\Software\WOW6432Node\Google\Update\ClientState\{430FD4D0-B729-4F61-AA34-91526481799D}" -name "CloudManagementEnrollmentToken"

Remove-File -Path '%ProgramFiles(x86)%\Google\Policies' -recurse


Remove Google Managed Mode, Uninstall and Clean up

Let us say you do suspect your device has been infected and you want to be confident that:

1) Registry settings that place Google Chrome under managed mode are removed

2) Google Chrome is removed 

3) Remnants such as Google Chrome taskbar and desktop icons are removed 

You could run the following PowerShell code:

remove-item -path "HKCU:\Software\Google\Chrome\*" -recurse -force

Remove-item -path "HKCU:\Software\Policies\Google\Chrome" -recurse -force

Remove-item -path "HKLM:\Software\Google\Chrome\*" -recurse -force

Remove-item -path "HKLM:\Software\Policies\Google\Chrome\*" -recurse -force

Remove-item -path "HKLM:\Software\Policies\Google\Update\*" -recurse -force

Remove-itemProperty -path "HKLM:\Software\WOW6432Node\Google\Update\ClientState\{430FD4D0-B729-4F61-AA34-91526481799D}" -name "CloudManagementEnrollmentToken"

Remove-File -Path '%ProgramFiles(x86)%\Google\Policies' -recurse

execute-process -path 'setup.exe' -parameters '--uninstall --multi-install -chrome --msi --system-level --force-uninstall'

remove-item "C:\users\*\Desktop\Google Chrome.lnk" -force

remove-item "C:\users\*\AppData\Roaming\Microsoft\Internet Explorer\Quick Launch\Google Chrome.lnk" -force

remove-item "C:\users\*\AppData\Roaming\Microsoft\Internet Explorer\Quick Launch\User Pinned\Taskbar\Google Chrome.lnk" -force

Conclusion

I did include the above script in a PSApp deployment toolkit wrapper, and registered it in MECM so that support staff could easily unmanage and remove Google Chrome for troubleshooting purposes.  Of course you can use any other package deployment solution, such as Intune, to achieve the same thing.  I hope you enjoyed reading this article and I hope my solution works for yourself, if ever you face a similar request.

Colin


Wednesday 19 April 2023

AutoPilot and the ESP 0x800705b4 Timeout Error

 Introduction

My client's request was for me to create an Intune Autopilot build.   Although the client did already provision and manage devices using MECM and a task sequence - their goal was to move away from this and in fact any on premise Active Directory dependencies.  Thus my task was to:

1) Configure Autopilot policies in Intune to install the required Apps and enable Hello for Business.

2) Configure the build with an Azure Active Directory only joined device rather than a hybrid Azure/On premise Active Directory joined device.

3) Use the Enrolment Status Page so that users could only access the OS after a selection of minimal applications had been installed.

3) Validate the above on a Hyper-V virtual machine.

And I did create the required configuration policies and I did import the VM's hardware hash into Intune.  When building a VM machine from a Windows 10 21h2 ISO file, and after entering my account credentials in the AutoPilot sign in window, it wasn't long before the ESP page appeared.  It would then stick on the Device Preparation Stage for sixty minutes (the configured ESP time out setting) before crashing with an 0x800705b4 error.


The Fix

An internet Google search pointed to various possibilities.  One of them suggested my VM needed 4 GB RAM and 4 Virtual CPUs configured on the VM.  My VM's configuration had 8 GB ram and it did have 4 Virtual CPUs - so this tip didn't address my issue.


I did deselect the Enable Dynamic Memory option but the error still appeared.

The breakthrough came while reading this ESP troubleshooting article:

https://learn.microsoft.com/en-us/troubleshoot/mem/intune/device-enrollment/understand-troubleshoot-esp

Under the section titled The Device subkey the illustration showed the Sidecar key under HKLM\software\Microsoft\Windows\Autopilot\EnrollmentStatusTracking\Device\PolicyProviders\


When I pressed Shift and Fn and F10 to bring up the command prompt on my VM, at the error message, and when I ran regedit I could see that I did not have the SideCar key. The SideCar provider is another name for the Intune Management Extension provider, which is required to install win32 applications. I did have the ConfigMgr key and then the penny dropped.  This Intune implementation was in in co-management mode with MECM and a previous pilot had been testing Autopilot with on premise Active Directory Join enabled setup.  A policy under Devices\Windows\Windows enrollment\\Co-management settings was in conflict with our Autopilot requirements.  Thus the Intune Management Extension provider was not getting installed - but this was required since this was an Azure Only Autopilot deployment. 

When I applied the following options in the co-management settings policy - the Autopilot ESP page was able to progress to the next stage and the provisioning was a success.

The Override co-management policy and use intune for all workloads option was set to Yes.  The Automatically install Configuration Manager agent option was set to No.  I also renamed the policy to Turn Off Co Mgmt, as can be seen.


I hope you enjoyed reading this article and I hope it helped you with your ESP issue.

Wednesday 15 March 2023

Android Single App Kiosk and Side Keys

Introduction

Recently I put together an Intune configuration profile for a Single App Kiosk on the Samsung Galaxy Tab A8.  After I got it working, in the way the client wanted it working; I did investigate how I could reset the device from the tablet itself.  It looked to be impossible: indeed I was under the impression that meeting this particular requirement, that is,  to reset the tablet from the tablet itself and not from the MEM portal, was addressed with the multiple app kiosk option.

I did however, find a way of resetting the device from the tablet in single app kiosk mode using the Power Button and the Side Keys feature.  Now I don't know if this is by design or by happenstance, but it is something that is potentially a security exploit, and therefore needs to be addressed.  And so this article will detail how you can reset an Android Tablet device in Single App kiosk mode, from the device itself.  And it will detail the configuration setting that will prevent users from tinkering with this potential exploit.  In addition it will briefly outline the construction of the profiles and apps used to create the kiosk.


The Kiosk Tablet Configuration

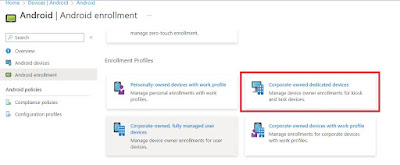
I will briefly outline the profiles instrumental in creating this particular kiosk build.  Starting with the Android enrolment profile we use a Corporate-owned dedicated device profile.

When the tablet is removed from its packaging and powered on, we tap the language selection screen five times to begin a QR code enrolment.  Using the tablet's camera we lock onto the QR code, and we complete the enrolment and setup experience.  The machine is automatically added to an Intune group based on the name of the enrolment profile.  This happens because the dynamic membership rule for this group uses the enrollmentProfleName property.


This works nicely and we can therefore assign to this group our configuration profiles.  The app for this single app kiosk is Google Chrome:Fast & Secure and so this app is assigned to this group.


The website that is presented as the screen for the kiosk is configured as a Managed Google Play web App.  This ensures that the user cannot open additional tabs on the Chrome browser.


The configuration profile that actually sets the tablet as a kiosk is a device restrictions profile.  In the profile we specify the Managed Google play web app and we also define a single app for the kiosk mode requirement.

How a user can exist Kiosk mode with this Configuration

And of course the whole purpose of the kiosk is a lockdown so that users cannot tamper with the device, creating additional support costs and potentially creating a passage to a security exploit.  Unfortunately a user is able to escape from the bounds of the Kiosk with this configuration.  Here is how it is possible.

1) The user presses on the Power Button on the side of the tablet.  


2) The user presses on the Side key settings option at the bottom of the screen.  The Side Key page appears.  The user selects Open App and then clicks on the configuration icon to the right of the screen.


3) The Open App window appears.  Here the user can select any of the installed or embedded apps.  This will not open the app however - it will only select it as the side key app.  In my case I did want to reset the device from the tablet itself.  Therefore I selected the Settings app.


4) With the app selected as the side key app, it would appear that the user has no option but to go back to the kiosk.  However if the user double clicks on the power button on the side of the tablet, after returning to the kiosk mode, the selected side key app appears.  In my case this was the settings app and so I was able to perform a factory reset.


How to Close this Exit Route

In the Device Restrictions profile expand General Settings and scroll down to Dedicated devices.  Set the Power button menu to Block.


Note:  The above setting may result in the provisioning getting stuck in the policy synching phase of the tablet build.  This is probably because a restart is required and the above setting may be preventing the restart.  You can initiate a restart from the MEM portal to progress to the kiosk built stage.

Conclusion

This blog shows you should spend some time examining the tablet build for possible exploits.  Thankfully in this case there is no need for too much concern because we are able to lock down the power button.  I hoped you enjoyed reading this blog and I wish you success with your own Kiosk configurations.


Thursday 19 January 2023

Metered Connections and MECM complications

Introduction

While assisting a client with an important application update, a handful of devices failed to process the mandatory upgrade deployment.  An examination showed the cause of this to be a setting on the device's network connection - they were configured to be metered connections.

The Symptoms

In addition to the failed mandatory deployment, it was found that when a user opened Software Center all that appeared was a blank white screen of nothingness.


In addition the ccmmessaging.log file was full of outgoing expired messages.


The Problem

On closer investigation it was found that the Set as Metered connection setting, on the user’s Wi-Fi connection was set to On.  This was strange given that the connection was a broadband connection and the user had unlimited data download. 

This setting was found by going into Settings\Network & Internet\Wifi\Manage know networks.  After clicking on the on the Wi-Fi connection in use and then clicking on Properties, I could see that the Set as Metered connection setting was set to On


Clicking on Properties revealed the problematic setting.

The Workaround

It was found that switching the Set as metered connection setting to Off and rebooting the device fixed the issues. 

The Fix

These devices belonged to users who worked remotely. Keeping such devices as up to date as any on premise device was paramount, given the security related concerns about devices that are not being properly managed. It was therefore decided that even if a network connection has been set to metered - Microsoft Endpoint Configuration Manager should be configured to communicate with the device nevertheless

This was done by opening the CM console and navigating to Administration\Site Configuration Manager\Client Settings and then selecting Properties for the Default Client Settings object.  Metered Internet Connections is then selected in the left pane and Allow selected in the right pane next to Client communications on metered Internet connections. Finally clicking on OK to apply the new setting. 


Further Remediation

Clients already affected by this may never receive the new client settings policyTherefore, they may not be fixed by the new setting.  In order to remediate this a script was written that sets the Metered Connection setting to Off on every Wi-Fi connection.

Here is a working example of the script. 

#--------------------------------------------------------------------------------------

$c="" 

$e="" 

$connection="" 

$connection=netsh wlan show profiles 

foreach ($c in $connection){ 

#echo "---------------------"$c 

if ($c -ne ""){ 

#echo $c.substring(4,3) 

if (($c.substring(4,3) -eq 'All')){ 

$e=$c.substring(27,$c.length-27) 

#echo "start it" 

netsh wlan set profileparameter name=$e cost=unrestricted 

} 

} 

} 

$g=get-date 

echo $g >> c:\windows\TurnOffMeteredConnectionsIntune.txt 

#--------------------------------------------------------------------------------------

This script was configured to run via Intune. 


Conclusion

I hope you enjoyed reading this article and I hope that it assists you in using MECM to manage your systems.


Recover your corrupted Linux HP ThinPro Thin Client Device

Introduction While testing some functionality in my HP  T530 Thin Client's Linux based ThinPro 8 operating system, I found myself with a...