Introduction
Windows Delivery Optimization is a peer to peer file sharing technology. Windows Updates and Windows Apps can be downloaded from the internet or from peer devices on the local network. In Britain there is a tradition of "Getting the Rounds in". This means that one person will go to the bar and order drinks for all of his or her friends. This is much quicker than each friend individually going to the bar and ordering his or her drink. In concept this is similar to what Delivery Optimization does for a number of devices on a network - it will decrease the amount of internet bandwidth usage, thus saving data costs. In addition it can decrease the amount of time required for machines on a network to be updated to the latest security and feature upgrade requirements - depending of course on how the administrator configures the settings within the Delivery Optimization peer to peer technology.
In Windows 10 release 2004 Microsoft has made some improvements to the PowerShell commands that an administrator might use to test and troubleshoot Delivery Optimization. The three improvements are as follows:
1) Get-DeliveryOptimizationStatus cmdlet with the -PeerInfo option: this provides real time visibility of the bytes received or sent between peering devices.
2) Get-DeliveryOptimizationLogAnalysis cmdlet: this provides a an overview of the Delivery Optimization log with an additional -ListConnections option to see which machines are retrieving cached data from your device.
3) Enable-DeliveryOptimizationVerboseLogs cmdlet: as the name suggests this PowerShell cmdlet will provide the administrator with more detailed log information for further troubleshooting or analysis.
Firstly I want to configure the Delivery Optimization settings via a GPO, so that HTTP blended with peering across a private group, is applied and tested on two domain joined clients - as in an on-premise environment.
Secondly I want to achieve all the testing on Hyper-V clients, rather than real machines - for obvious reasons this is very convenient for IT professionals. Testing concepts, new features and configurations is easy to do in a virtual environment; as is documenting them as well.
Thirdly, I want to test the Get-DeliveryOptimizationLogAnalysis cmdlet with the -ListConnections option. This is a very convenient cmdlet which can tell us if Delivery Optimization is actually engaging and behaving as we would expect such a feature to behave.
This article assumes the reader is an IT administrator and thus will not include fine detailed step by step instructions on how to configure a testing environment similar to my own virtual testing environment. I will however detail my testing environment and provide a step by step overview, so you can emulate it if you desire.
In order to test the above Delivery Optimization PowerShell feature I start with two freshly built Windows 10 2004 Enterprise Eval Hyper-V machines. Their netbios names are CLIENT12004v2 and CLIENT22004v2. I join them to the domain (called domain1) and then complete the following:
1) Create an OU called DeliveryOpt and move the test machines into the OU
2) Create a GPO called Delivery Optimization containing the required DO settings and link it to the DeliveryOpt OU
3) Configure each client test device with two network adapters. One network adapter is an External virtual network switch and the other is a Private network switch. Thus each test VM has access to the internet as well as full access to the Domain Controller simulating an On Premise environment.
4) I then begin installing updates and test the new Get-DeliveryOptimizationloganalysis cmdlet with the -listconnections option to verify Delivery Optimization is taking place.
Let us begin.
The Delivery Optimization Organisation Unit
Ensure your test machines and user accounts are added to the Organisation Unit, similarly to how I have structured my own test devices.
The Delivery Optimization GPO
The GPO requirements for our test environment are to set the Download Mode to option number two.
The options can be found at Computer Configuration\Policies\Administrative Templates\Windows Components\Delivery Optimization
Firstly lets consider the Download Mode Options as listed in the GPO setting itself:
Obviously option 0 is not suitable because we do want to test the peering feature. Option 1 should work in our test environment, however for most customers this is not the best option, even though it appears it might be the best option. If two machines in two separate on premise locations are using the same internet connection then DO considers them to be peers even though they are not peers. Thus we need to select option 2. Option 3 is not suitable because we are testing two machines in an on premise scenario.
Accordingly our setting is as follows:
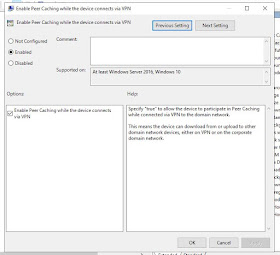
The next setting in my environment, to reflect a realistic customer environment, is to Enable Peer Caching while the device connects via VPN.
Now because I am testing Download Mode 2 I need to specify the source Group ID, thus I configure the Select the source of Group ID's setting so that the machine's AD Site option become the source of the Group ID.
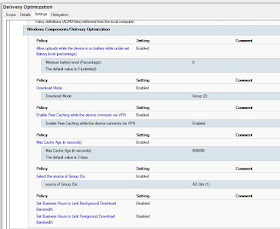
And again, configuring settings realistically, according to a customer site, I want to change the Max Cache Age (in seconds) to 604800 which is one week
Our imaginary client would like a device to be a peering device even while on a battery - thus I set the allow uploads while the device is on battery while under set Battery level (percentage).
Because this is my test environment I do not want testing to be hampered by business hour settings. Consequently I set the Set Business Hours to Limit Background Download Bandwidth to disabled. I also do this for the Foreground setting.
For convenience - if you would like to ensure your settings are aligned with mine - here is a screenshot of the enabled, Not configured and disabled settings.
Having created the Delivery Optimization GPO verify the settings and ensure it is linked to the required OU.
Configure Client Network Adapters on Clients
As mentioned above we need each client to have both internet connectivity and also connectivity within an internal domain - representing an on-premise scenario. There are a number of ways to achieve this however the reader may want to copy my configuration for testing: and thus the screenshots are included.
I use two virtual network switches. The first one is for internal domain connectivity and is a Private Network.
The second virtual switch is for internet connectivity and is an External network.
Thus each test client has two network adapters - one that is connected to the private virtual switch and one that is connected to the external virtual switch.
Delivery Optimization Network Ports
We are only testing on virtual hosts and so I turn the Windows Defender Firewall off on each Hyper-V client. For obvious reasons I do not want to do this on my host device, but I do want to ensure that Delivery Optimization ports are open between my host device and the Microsoft sites where updates definitions and files are located. The ports required are UDP 7680 and optionally 3544. Therefore I create inbound and outbound rules for these ports.
Preparing the Hyper-V Operating Systems for Delivery Optimization Testing
Having installed and configured our virtual environment we can now install some updates and test the new PowerShell features, but firstly I will add a few notes on how to prepare your Hyper-V client's OS environment. I did find it a bit tricky to get this working and you may find my notes here useful. I will not go into detail on each step because that is beyond the scope of this article. Here is how I prepared each virtual
1) Downloaded Eval version of Windows 10 2004 iso file.
2) Created each virtual as generation 1 types with 4GB of RAM and 1 virtual processor
3) DVD configured to use the Windows 10 Evaluation iso.
4) Run through the Windows setup process accepting the default options but bypassing the Azure AD join (selected Domain Join)
5) While machines were in a workgroup I disabled the Windows Update Service and created checkpoints.
6) Created each VM's computer account in AD and added to the Delivery Optimization OU.
7) Joined each machine to the domain and took another checkpoint.
8) Performed a gpupdate /force command on each Virtual and then a reboot.
9) Enabled the Windows Update service after the restart
10) Performed a Check for Updates cycle in Windows Settings on each Hyper-V machine.
11) Executed the Get-DeliveryOptimizationLogAnalysis -ListConnections PowerShell command, new to Windows 2004, on each virtual machine.
Get-DeliveryOptimizationLogAnalysis -ListConnections
This article is the result of much tweaking and testing of the GPO and also the virtual clients - and it felt like a great achievement when it all started working as it should.
As stated in the introduction, Microsoft implemented the Get-DeliveryOptimizationLogAnalysis powershell cmdlet with the -listconnections option so that an administrator can test, troubleshoot and refine the Delivery Optimization configuration as required.
On the first machine on which I initiated Check for Updates Cycle I could see that I had finally achieved what I wanted after executing the PowerShell cmdlet as shown on Client12002V2. Because this virtual was the first one on which I initiated the Updates Cycle, it became the peer serving client which is why there are peering files but not number for the NumFilesGotPeers value.
On the second virtual machine, whose NetBios name is Client22004v2, I initiated a Windows Update Cycle, waited a minute or so, and then rebooted the device. After the restart I could see that things had picked up from before the restart and that the device was both downloading updates from its peer as well s providing updates to its peer.
If desired you can export the Delivery Optimization log file by using the get-deliveryoptimizationlog cmdlet to a log file. In this capture we can see the command executed to create a file called dolog.txt and the peer connection attempt within that text file.
Finally - having tested the above cmdlets, we can verify that peering has occurred within Windows 10 Settings\Updates and Security\Delivery Optimization\Activity Monitor.
Here is the output from Client12004v2
And here is the output from Client22004v2
I hope you enjoyed reading this article and I wish you much success in your own testing of Delivery Optimization on your Hyper-V virtual machines.


